React Native is a framework that allows us to build native (iOS and Android) apps using the React JavaScript framework. While React Native also permits development in native languages for Android and iOS, Expo, on the other hand, only permits the use of purely JavaScript and React for the purpose of development, and provides the Software Development Kit (SDK) and the build environment so that we can only use the provided modules for native development. While it is true that Expo lacks the flexibility and the supported features, it also has a special advantage — the fact that we can use it to build apps quickly just with JavaScript and that we do not need to install any additional native build environments (such as Android Studio or xCode) on our PC.
Recently, with the release of React Native for Web, React Native has introduced a new addition to its supporting platforms. Expo, in accordance with the current trend, has started supporting the beta version of Expo Web with the release of Expo SDK v33.0.0 in June. Expo Web enables the implementation of a mobile Web and also support Progressive Web Apps (PWA). This means that the components provided by React Native and Expo can not only be built for the native app, but also can be executed on the web using the same components. As is true for React, ReactDom is used for rendering on the web.
In this article, we will focus mainly on the Expo Web instead of “React Native for Web.”
There is, however, one thing that I would like to mention first: while the underlying philosophy of “Write once, run everywhere” gives us hope, it does not mean that we can sit idly by without making any effort.
Although Expo is capable of supporting three different platforms, it is difficult to support three different platforms’ endemic functionalities equally. Therefore, we must admit that we need to carefully structure our program by using methods such but not limited to feature detection. Despite all of this, the expectation that we place on Expo Web is warranted by the fact that it challenges the boundaries of possibilities with Front End technology.
One more thing that can be looked forward to is that, with the faster response time, the development cycle will become faster.
Because using a simulator to communicate with the native app is still a slow process, if we substitute it with a faster and immediately-executable web version of the application, we can expect it to expedite the build time as well as the HMR. Furthermore, with access to the Chrome Devtools, we can look forward to faster development up until the basic skeletal template of the application.
In this article, we will explore the installation, execution, development, testing, and release using the Expo Web (beta).
Characteristics (Pros & Cons)
One of the main characteristics of React Native, having been written in JavaScript and React Framework, is that it can operate on multiple platforms.
Officially, it supports iOS and Android platforms. While previously, Microsoft directly sponsored Windows support, now that the OS has been merged into Windows 10, the platform support is being rewritten based on Windows 10. Furthermore, with the newly added support for the web, I’m getting more and more excited just by talking about it!
The browser support range, as of now, includes Chrome, Firefox, Edge, Safari 7+, and IE 10+. Considering Internet Explorer’s sizable market in Korea, it certainly is a relief.
React uses the virtual DOM so that the layers like React DOM can handle the actual rendering. Because the virtual DOM and the rendering layers have been separated, it can render according to multiple different platforms — therefore being the perfect fit for the purpose “Write once, run everywhere” In other words, if you write the application using a component supported by React Native, the app will be rendered into the desired platform.
The snippet below is created automatically when we run expo init based on the initial settings. Although components like React Native’s Text and View are platform-independent, at runtime, they will be rendered to suit the respective platform.
import React from "react";
import { StyleSheet, Text, View } from "react-native";export default function App() {
  return (
    <View style={styles.container}>
      <Text>Open up App.tsx to start working on your app!</Text>
    </View>
  );
}const styles = StyleSheet.create({
  container: {
    flex: 1,
    backgroundColor: "#fff",
    alignItems: "center",
    justifyContent: "center"
  }
});
Not All Features Are Created Equal
Between iOS and Android, there are inevitably some features or components that cannot be shared or integrated. Such components are platform dependent features and are inevitable due to the fact that different OS has inherently different native features. Furthermore, such components can happen because of different store regulations, and the web, too, falls under the same restrictions.
When writing the source code using Expo, there are times when we have differentiate between platforms, and the support range for the web is no different. For example, the Contacts feature exists in both iOS and Android, but naturally, on the Web, it does not exist.
A list of features compatible with Expo Web can be found here.
Installation and Execution
By following the Expo SDK v33 Release Notes, we can easily install and execute the program.
npm install -g expo-cli
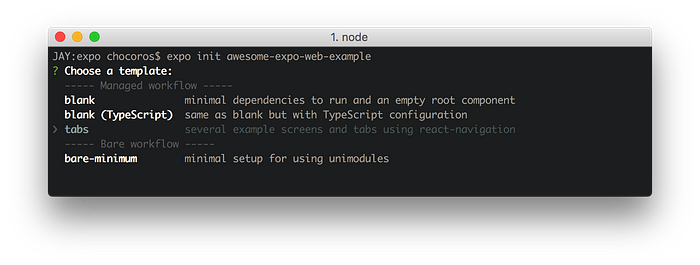
expo init awesome-expo-web-example
When we are running the expo init, there is a number of configurations that can be made, and by selecting tabs, we can discover and use numerous examples written with react-navigation based on tabs. We will use this example to test for the web, iOS, and Android.
If we look in the app.json file after installation, we can see that the web platform has been added under platforms.
{
  "expo": {
    "name": "awesome-expo-web-example",
    "slug": "awesome-expo-web-example",
    "privacy": "public",
    "sdkVersion": "33.0.0",
    "platforms": [
      "ios",
      "android",
      "web"
    ],
    ...
  }
}
Now, let’s actually run the Expo Web.
cd awesome-expo-web-example
expo start -w
But wait. We’re getting an error. According to the github discussion, it only happens when running the web, and we simply have to wait for the new patch to resolve this issue.
In order to test the web version, you have to change the name of the image file in the following path, and for iOS and Android, you must correct the appropriate source.
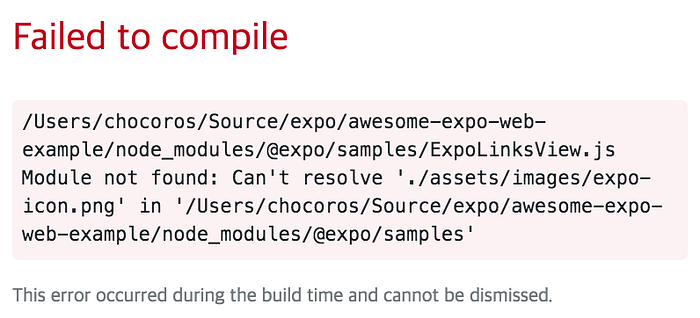
node_modules/@expo/samples/ExpoLinksView.js
<Image
  source={require("./assets/images/expo-icon@2x.png")}
  ...
/>-woption opens the web version in the browser.-ioption opens the iOS version.-aoption opens the Android version.
We can now see that all three platforms are running accordingly. The sources are, from left to right, Web, iOS, and Android.
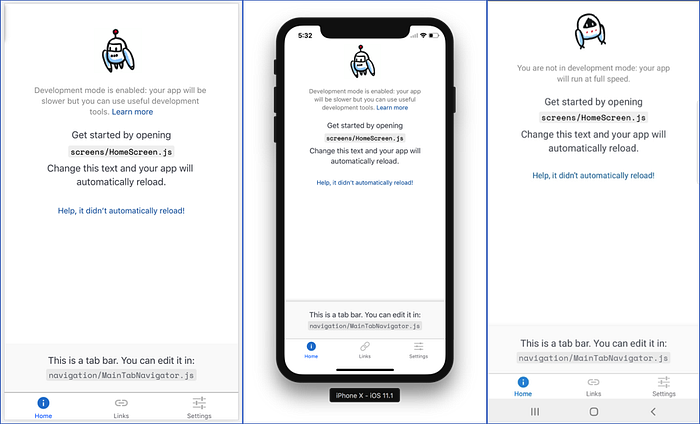
Expo Web Build
Building for an actual release is incredibly easy as well. build:web has been newly added to the collection of build:ios and build:android. However, it is still in a beta mode, and when we run the program after compiling the production build, we run into an error. Therefore, as of now, we must use the development mode to test the final product.
Extending the Webpack Config
We can expand the webpack config file to build in development mode. First, install @expo/webpack-config, and create a webpack.config.js file to do so.
yarn add -D @expo/webpack-configCreating the webpack.config.js File
const createExpoWebpackConfig = require("@expo/webpack-config");module.exports = function(env, argv) {
  env.mode = "development";
  const config = createExpoWebpackConfig(env, argv);
  return config;
};
Web Build
expo build:webThe final products of the build is the resource drafted with Webpack and JavaScript, and the product is saved in the web-build directory.
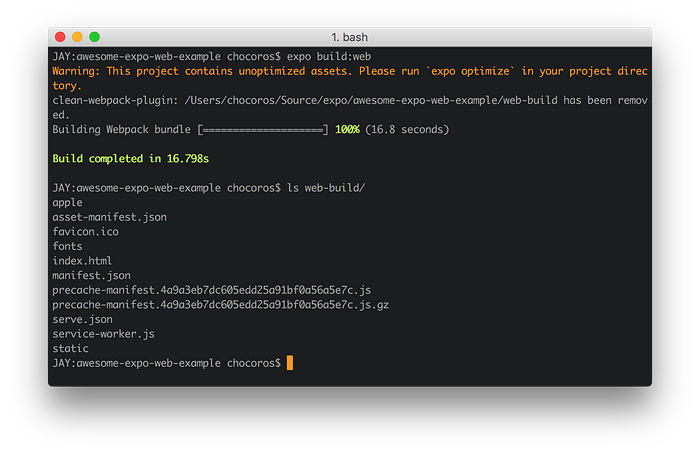
Progressive Web App (PWA) Support
Expo Web offers support for the Progressive Web App (PWA). Based on information found in Expo’s app.json file, Expo builds the maifest.json, the configuration file made for PWAs. We can also observe that the service-worker is being used in the created index.html.
<script>
  if ("serviceWorker" in navigator) {
    window.addEventListener("load", function() {
      navigator.serviceWorker.register("/service-worker.js");
    });
  }
</script>
Upon inspecting the product using Chrome Devtools Audits (Lighthouse), we can retrieve the analysis of PWA support.
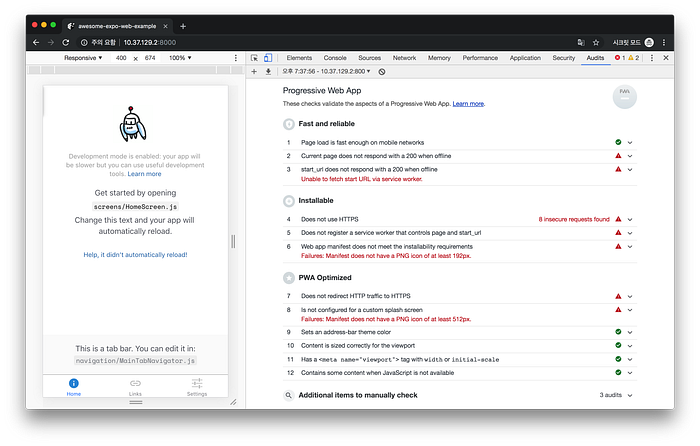
Adding Static Files
We can add static files to not only to the JavaScript source file built with Expo and imported files, but we can also implement static files to be served on the web app. To do so, on the root of the source, create a new directory with the name web, and add static files into the folder like below.
/web
   ㄴTOAST UI Grid v4.0.png
   ㄴother resources.file
When we’re done collecting all the necessary files, we can use expo build:web to see that the web-build/TOAST UI Grid v4.0.pngfile has been added and that it is working properly on the server-side as well.
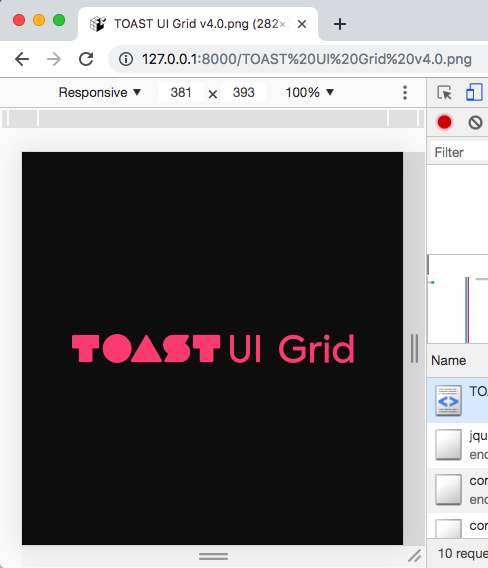
Publishing the Web Product on Github
Granted, in the beta version, Expo Web production build still has some glitches to work out. However, I’ll let you in on a little tip to be able to publish the product once the glitches have been patched.
Web apps built with Expo Web can be served as soon as it has been uploaded on any server, and this is where Github comes into play. The FE Development Lab Open Source also uses Github to host the API documentation, and we have been using gh-pages to publish with incredible ease and convenience.
We need to initialize a new repository, and without a further ado, let’s publish our Expo Web on the Github pages.
git remote add origin https://github.com/dongsik-yoo/awesome-expo-web-example.gitnpm i --save-dev gh-pagesnpx gh-pages -d web-build
Using Storybook to Test on Three Different Platforms
Storybook is an amazing E2E testing tool that allows us to build component level UI for testing purposes. When we are programming for iOS and Android using Expo on development mode, we can become a little frustrated due to the slow progress. This is where Storybook can be of great help.
Storybook enables immediate creation of UI components, and its incredibly fast development can play a major role in developing with Expo. To further the point, Storybook not only supports React Native, but also supports Expo Web version.
Configuring the Storybook Environment for React Native’s
Configuring the Storybook environment is outlined thoroughly on Storybook React Native Installation Guide.
npx -p @storybook/cli sb init --type react_nativeUnlike installing Storybook for react, a storybook folder is created instead of .storybook (note the dot). Upon installation, we must change the entry file to be the Storybook’s UI. Despite the subtle disadvantage that we have to meddle with the source code in order to test our product, it is still a faster way to develop our product than it is with a simulator.
Editing the App.js File
/*
For the sake of Storybook, comment out everything else.
*/
export default from "./storybook";
Adding index.web.js File
In Storybook’s React Native version, the formats of test files used to test on different platforms were of index.{platform}.js form. If we look under the created storybook/stories/Button folder, we can see that the two files for iOS and Android have already been created for us.
- index.ios.js
- index.android.js
Here, if we add index.web.js file, we can now start testing for Expo Web using Storybook.
import React from "react";
import { TouchableHighlight } from "react-native";export default function Button({ onPress, children }) {
  return <TouchableHighlight onPress={onPress}>{children}</TouchableHighlight>;
}
Testing React Native Web
Now, if we run Expo Web with expo start -w, we can see the Storybook UI on the browser, and we can now use react-nativecomponents. While it can feel half-worked due to the lack of Storybook server, it is completely suitable for HMR, UI development, and iOS and Android testing. After execution, we can also observe that <TouchableHighlight> component has been rendered into a div.

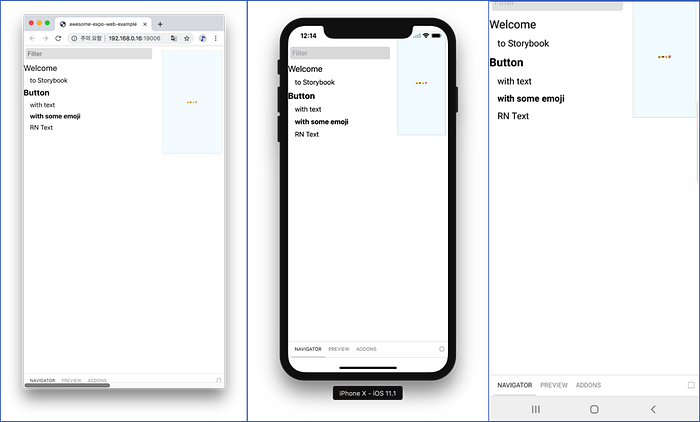
Running the Product on Three Different Platforms
The image below, from left to right, is the executed testing results of Web, iOS, and Android on Storybook.
As We Wait for the Official Release
There is no hiding that there are still some glitches, like production build and integration with github pages, given that Expo Web based on React Native for Web is still in its beta stages. However, members of the Expo team is working arduously to provide frequent feedback to its users and fans to stabilize the program.
The SDK v34 is expected to be released with the Release Candidate (RC) version after finishing beta testing, and SDK v35 is the long awaited official release, according to the official expo blog.
React Native opened a gateway to a whole new world by enabling Front End technology to be applied to mobile native applications, and now by including the web in its support range, it is opening even more possibilities. As we wait patiently for more incredible work being done by React Native and Expo, we encourage the bold challenges to the boundaries of possibilities.


